
In the first part of this article we took stock of Gulp's job as part of our front-end build process, in order to replace it with webpack which is better suited for the js module system and code-on-demand approach rather than just one single project albeit optimized package.
What is webpack?
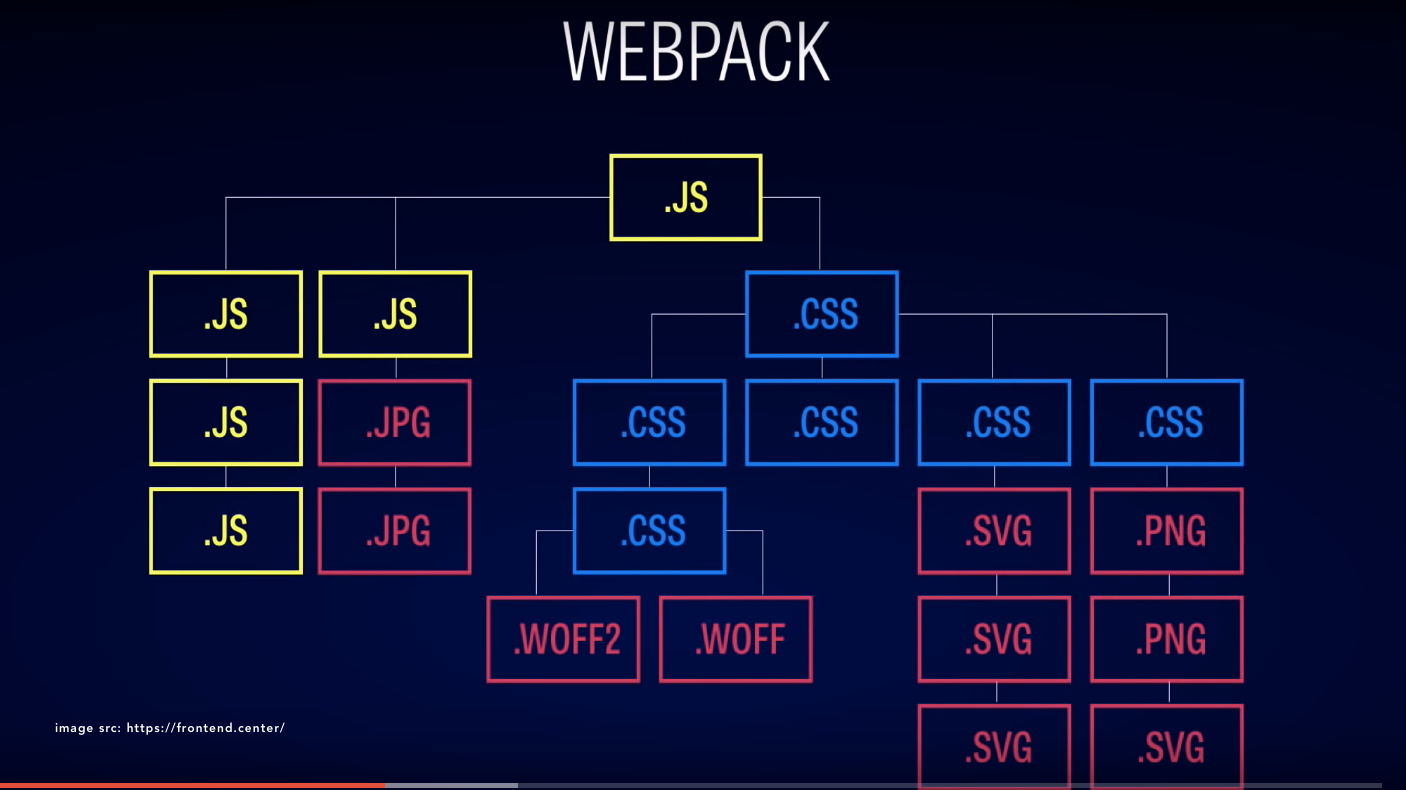
webpack is a module bundler, that takes modules with dependencies and generates static assets.
In JavaScript, modules are small pieces of independent and reusable code which expose (export) some of their components (objects) for other modules that require them.
If the above paragraph felt like visibility/accessibility modifiers to you, it's ok to feel that way.
One of the benefits of the module system in JavaScript is that it tackles the problem of JavaScript code in the global scope, which hampers perfomance and makes development more difficult due to side-effects that can be hard to trace.
ES6 introduced native support for JavaScript modules for the first time, and it is yet to have widespread support in browsers. Before ES6 the two popular approaches to the module system are CommonJS Modules and AMD. We can enjoy the benefits today by using a transpiler like Babel, which converts modern JavaScript code to browser supported ES5 code. But I digress, you can read more about JavaScript modules on airpair
Webpack approaches every static asset as a module and looks out for their dependencies and loads them as needed depending on an entry point's dependencies. This provides a big performance boost for large projects that can have multiple dependencies.
Setting up our webpack project
Our webpack project setup is similar to our Gulp project. A src/ directory with our development assets and a dist/directory for the buid output.

You can clone the Github repo here. cd into the webpack-build directory and run yarn to setup the tools we'll be using for the webpack build.
webpack configuration.
Like Gulp's configuration file, gulpfile.js, webpack uses a configuration file, webpack.config.js to manage its build process. At the very basic-level a webpack config file consists of entry-point(s) files and corresponding output(s) files. An entry point represents a module and the dependencies specified in the code are processed and bundled to the output.
To build your webpack bundle with this basic configuration all you need is to run webpack from the command-line
webpack
and webpack will output the processed file in the path specified in the config file's output property.
webpack is able to process JavaScript naturally, if a module needs non-JavaScript modules, webpack uses loaders and plugins to process these resources.
We have a number of non-JS resources in our project such as css, and sass. Let's see how all these come together.
Rebuilding our project with webpack
For our build, we'll be requiring a number of modules from our entry file ./src/js/app.js.
There are quite a number or modules being required here, some are third-party JavaScript modules, custom JavaScript modules, Sass files, etc. Remember we can also require other static assets like images or even fonts in our modules, and with the appropriate loader, webpack will treat them as a module.
Luckily, in the first part of this post we took stock of the job description for our front-end build, It comes in handy as we upgrade our basic webpack configuration to handle the entire project.
Based on the job description, we can now upgrade our webpack config file as follows:
Matching the job description in the table with the upgraded file makes it easy to follow what is happening in the webpack config file.
Now you are ready to build with this new configuration and take your project live. Our build command will be a little different, as we want webpack to optimize our files for production. Running webpack with a little modification ensures we get all the optimisation goodness
webpack -p
That should do it. From the results, we have successly replaced Gulp with webpack and our build works perfectly with all the optmisation benefits.
We have only touched the surface in this post as webpack can do a lot more. This is a good thing but it has many times made it difficult for beginners to jump into webpack as many resources move from simple stuff to advanced stuff without closing the gap. Remember you can clone the Github repo here.
If you are new to webpack, take some time to see webpack from first principles.
When you want to start your project, you'll always find it helpful to list the jobs you want done by webpack, like in the table above and then pair that with the configuration, modules, and loaders you need to make that happen.