We are pretty much done with the first week of February but it's never too late to say a Happy new month!
Getting a virtual private server (VPS) has never been easier. From Digital Ocean to Linode and Rackspace to Amazon (just to name a few) developers are quite spoilt for options. There is pretty much an option out there for any pocket size or server requirements. This article however is focused on some basic security tips that you should follow once you get your shiny new VPS up and running. Let's get started!
Disclaimer: We're terribly biased towards Linux (specifically Debian based distributions) so the checklist here would use only Linux examples. Feel free to adapt the ideas to your own environment though. If you don't want to run these examples on your live server, you can check out this article on provisioning a vagrant box for your use.
Firewalls
To all Greek mythology lovers (and those who saw the movie Troy) the term 'Trojan Horse' should not be unfamiliar (you can check here for the gist. The moral of the story is if the Trojan Horse never got past the gates the people of Troy would have lived happily ever after. Tying that to our current discussion, the best way to secure your server is to prevent people or things or bots or anything really from going in. To pull that off we'll use Iptables, linux's default firewall application (you can read more about iptables here).
We want to close the gates to our server but we certainly do not want to be locked out! We'll add a rule which allow all connections that are already established to pass through. This way if you are (which you most likely are) connected via ssh you do not get kicked off!
iptables -A INPUT -m state --state ESTABLISHED,RELATED -j ACCEPT
Before we start blocking all traffic, we'll allow traffic on commonly used ports via the publicly accessible interface. It's usually eth0 on most VPS's. You should run ifconfig to figure out which interface is publicly available.
Typical commonly used ports are:
80(for web access)443(SSL web access)22(SSH access)
You could have others, it all depends on what you've got running on your server. So let's open these ports up
iptables -A INPUT -p tcp --dport 80 -i eth0 -j ACCEPT
iptables -A INPUT -p tcp --dport 443 -i eth0 -j ACCEPT
iptables -A INPUT -p tcp --dport 22 -i eth0 -j ACCEPT
Now with these ports opened up, we can then block all traffic coming in via eth0.
iptables -A INPUT -i eth0 -j REJECT
Before saving these rules, you should test that you are still able to access your webserver on ports 80 (on the web), 443 (if you've got SSL enabled) and 22 (SSH).
Finally we need to save and apply these rules:
iptables-save > /etc/network/iptables.up.rules
iptables-apply
And you're all set.
Note:
There is a small inconvenience with this approach. For every application you run or set up that utilizes a port not already opened you would have to drop in a rule to let traffic pass through that port.
So if we installed a service that utilizes port 10000 as an example, we would need to insert a rule just before the last reject rule which allows traffic in on this port. To do this, we first need to figure out the rule-number for our reject rule.
iptables -L --line-numbers
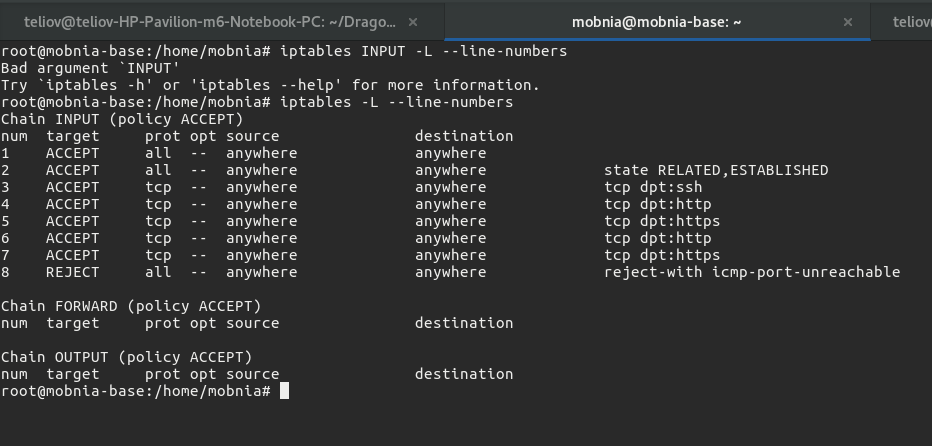
This lists rules with their line numbers. A sample output is show below:

As can be seen, the REJECT rule has rule number 8, so to add our new rule we simply do:
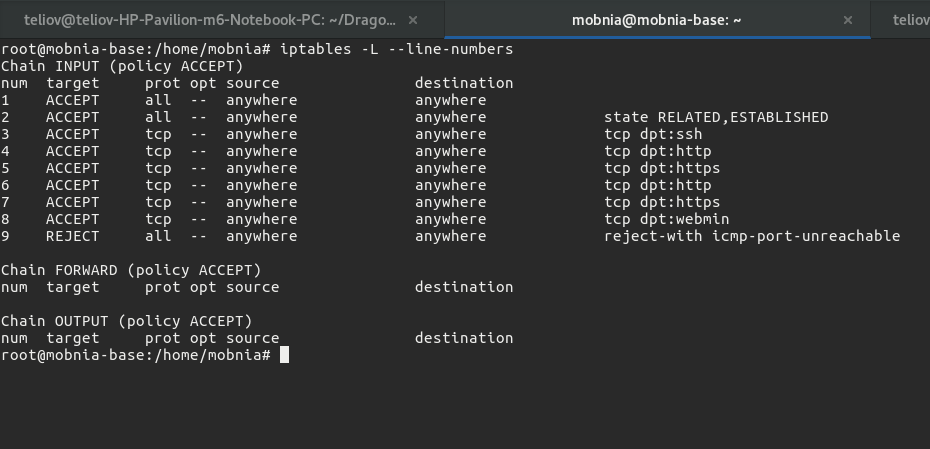
iptables -I INPUT 8 -p tcp --dport 10000 -i eth0 -j ACCEPT
This inserts the new rule just above the REJECT rule:

And you're good to go.
Root Password Logins
If you still use a password login to access the root account on your server, please stop, it's 2017 already! In fact the best thing would be to disable ssh access as root all together. Rather create a user who has sudo privileges instead. Pick a really funky username too (please don't think admin). A benefit of this is that someone trying to brute force his/her way into your server would not be able to do so as root and if they wanted to do so as your funky user they would have to guess the funky name as well.
First let's create a user (if you don't already have one) that would have sudo access. To do this you can follow the tutorial here. Remember to pick a username that is not so guessable. You should try and ssh into the newly created account.
Once that is done you can disable root login via ssh in the sshd config file. The config file should be located at /etc/ssh/sshd_config. Open up the file and look for the PermitRootLogin setting. This setting can either be yes, prohibit-password, without-password,forced-commands-only or no. We'll be setting this to no. This means it would be impossible to ssh as root into the server. Save the file and restart the ssh service:
service sshd restart
You should also look into using ssh keys for logins as opposed to using passwords all the time. It'll save you some few keystrokes (might be the difference between life and death =D).
Security and Obscurity
One other way of improving your server's security is by not using the defaults. For instance, every one knows that port 22 is the default ssh port. Any one trying make a play at gaining access via ssh to your server would most likely try whatever trick on that default port first of all. You can easily change the ssh port by setting it to something other than 22 in the sshd_config file. Just look for the Port setting and change it to your new port.
Note:
Security by obscurity should not be your primary defense. While it might help you avoid broader scans (like one checking for ssh on port 22) it won't be of much use against a targeted attack.
You should also do same for common applications, for example:
- Mysql typically runs on port
3306. If you've enabled non-localhost access to your mysql server, you can change this default port. - Phpmyadmin by default is accessed on /phpmyadmin of your server. You should also change this to something else.
- The list goes on ...
But you get the point, try as much as possible not to stick to the defaults. If you think of security as an onion, then obscurity is one layer that needs to be gotten out of the way.
Roundup
There you have it. These are just simple things you can do so you sleep better at night. And to those of you scoffing at this article, already making a list of counters and exploits for every item on this list, I'd love to hear from you. Yes you! Let me know the potential flaws in this write up. We're all still learning after all.
Once again happy new year. Let's all do great stuff this new year.

