

Introduction
Automating your workflow is a must for every time conscious developer. There are a plethora of tools and services which aid the automation process but this article would focus on automatic deployments from your bitbucket repo to your server.
For many developers the existing work flow probably looks something like this:
push to bitbucket > ssh into server and pull changes >
This of course assumes that you are using git in your workflow (P.S. If you're not, then you're stuck in the stone ages)
An automated deployment process from bitbucket to repo would save you the extra time spent logging in via ssh, prevent annoying permission issues and add some all round awesomeness to your team 😉.
This tutorial is based on the automatic bitbucket deploy repo by bitbucket user @lilliputten.
Prerequisites
In order to complete this tutorial your system/server should meet the following requirements:
- PHP > 5.3 (with PHP's exec function enabled)
- Git
- ssh
- shell access on the server (with sudo capabilities)
Baby Steps
The first step would be setting up an ssh-key for the user who would be responsible for making changes on the server. For most people that would be the www-data user (who is the default owner of the web-root directory).
Log in to your server and get a bash prompt for the www-data user via this command:
sudo -u www-data bash
Create the .ssh directory for the user if it is not present and generate the ssh-key
cd ~
mkdir .ssh && cd .ssh/
ssh-keygen -t rsa
When creating the ssh-key you would be asked for a passphrase. Leave this blank. While this is not recommended in a normal use case it is necessary as we want the server to be able to make changes to repositories without having to enter any passwords.
Also create a config file in the .ssh directory with the following content:
Host bitbucket.org
    IdentityFile ~/.ssh/id_rsa
ssh-keygen generates a public and a private key pair.
The id_rsa file above is the private key. The configuration above ensures the correct key is used when connecting to bitbucket servers.
Copy the contents of the public key ( the key with extension .pub). Navigate to Account > Settings > SSH Keys and add the ssh-key of the server.

Adding the key on bitbucket authorises the server to read (and write) to your repositories.
Personalisation
Fork the automatic deployment repo (so you can make changes to the repo as you please).
Clone this forked repo locally. The repo (as at the time of writing) has the following directory listing:
.gitignore .htaccess bitbucket.php CONFIG.php bitbucket-hook.php index.html log.php README.md
IN the CONFIG.php file can specify settings unique to your use case.
Go on ahead and enter your bitbucketusername, repository path and project path where required in the CONFIG file.
For the $REPOSITORY_PATH use /var/repositories, while for the $HOME_PATH and $PROEJCTS_PATH use /var/www/html. The /var/repositories folder is by default out of apaches access paths and so will not be accessible by anyone via the web. /var/www/html is usually the default location for websites in apache. You are of course free to use any directory you want as long as you handle the permissions properly.
The bitbucket-hook.php file is the entry point for the deployment process. You should rename this file to whatever suits you (for security sake) e.g. 256bc6c7599785fc8d0d157d8f28f.php (you don't want malicious users guessing correctly now do you 😇)
We would also like to run a test later on in this tutorial so in the CONFIG.php file, there is a $PROJECTS array which holds the projects which should be automatically deployed. Go on and add the automatic deployment repo to that array
$PROJECTS = array(
	'automatic-bitbucket-deployment' => array(
		'projPath' => $PROJECTS_PATH.'automatic-deployment/',
		'branch' => 'master'
	)
);
You are also able to specify which branch should be deployed.
Security Security Security !
Next step is to get the automatic bitbucket deployment code up on your server. You might be tempted to just cd into your web root and do a git clone. Don't!. It is not nice to have your .git folder in production. The guys at Internetwache have an interesting article on the potential security flaws of this approach here. And while there certainly are many workarounds to fix this (using apache/nginx configurations etc.) it's always better to be safe than sorry no?
To fix this: create a directory not accessible by the webserver but which can be written to by the web-user. For the sake of this tutorial let's use the /var/repositories directory.
mkdir /var/repositories
chown -R www-data:www-data /var/repositories
This directory would contain the bare-repositories (just the .git folder) for all the repos on the server (bare meaning that it does not have a working copy i.e. no source code thingy).
Go on into your repositories directory and clone a bare copy of the forked repo. Do make sure you are running this commands as the www-data use so you do not run into permission issues later.
# this would switch you to the www-data user
sudo -u www-data bash
cd /var/repositories
git clone --mirror git@bitbucket.org:<username>/automatic-bitbucket-deployment.git
This by default creates an automatic-deployment.git directory.
Create a folder in your web root directory (/var/www/html in this case) which would hold the working copy of the repo.
mkdir /var/www/html/automatic-deployment
We are now ready to make an initial checkout of the repo.
cd /var/repositories/automatic-deployment.git
GIT_WORK_TREE=/var/www/html/automatic-deployment git checkout -f master
Almost there!
You should go on ahead and create a configuration in your webserver so that this repo is accessible online.
If you are using apache (2.4), your config could be as simple as the one shown below. Remeber you will need root access to do this. So if you are still running as www-data you would need to switch back to root.
<VirtualHost *:80>
    <Directory  '/var/www/html/automatic-deployment'>
        Require all granted
        allow from all
    </Directory>
    Servername deploy.example.org
    DocumentRoot '/var/www/html/automatic-deployment'
</VirtualHost>
and if you want to put that straight into a file:
echo "
<VirtualHost *:80>
    <Directory  '/var/www/html/automatic-deployment'>
        Require all granted
        allow from all
    </Directory>
    Servername deploy.example.org
    DocumentRoot '/var/www/html/automatic-deployment'
</VirtualHost>
" > /etc/apache2/sites-available/automatic-bitbucket.conf

# activate the config
a2ensite automatic-bitbucket.conf

# reload apache
service apache2 reload
If you have followed this tutorial step by step then the url which would serve as your webhook for future projects would be: deploy.example.org/256bc6c7599785fc8d0d157d8f28f.php
An excellent first test would be using the repo to manage itself ("automating the automater").
In your forked repo on the bitbucket web interface navaigate to Settings > Webhooks > Add webhook and add the webhook url above.
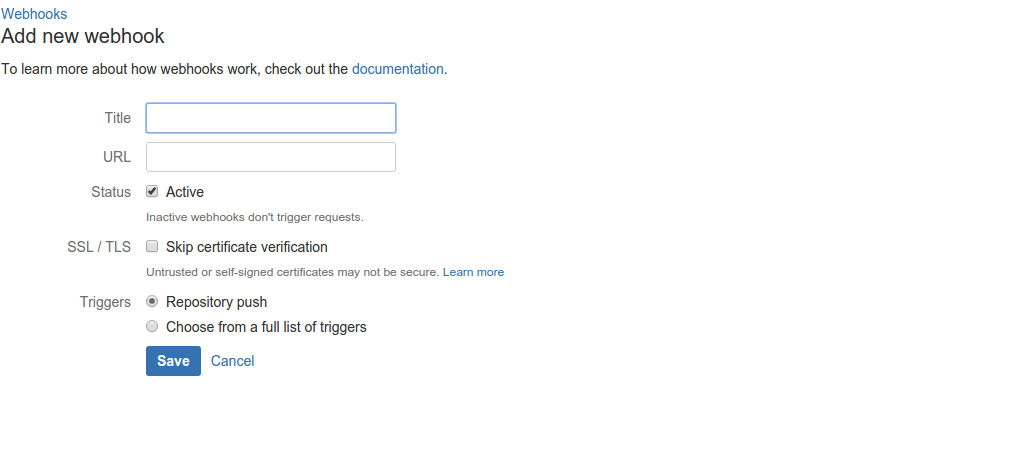
For this purpose, only the repository push trigger is necessary. You can modify the automatic deployment process to handle other triggers.
Remember that we had initially added the automatic-deployment repo to the list of repositories which should be automatically deployed. Well then make some change, perhaps to the readme file, and push the updates.
Confirm from the server that the changes were indeed made.
Round Up
All you need to do from now on is specify the repository and the branch to listen on in the CONFIG.php file locally, push the changes and every other push made to the specified branch of the specified repo would trigger a deployment on your server.
As an addition, you can modify the process to check that pushes coming in are only from bitbucket. This can be done by whitelisting only bitbuckets IP addresses. You could also add an integration to your team's chat application (if it supports that) so you get notified once a successful deployment has happened.
And that's all !